Cold winter mornings can be a struggle, but you don’t have to face them alone. Installing a wall-mounted electric bathroom heater is the perfect way to warm up your morning routine and keep you cosy in those chillier months. With our handy guide, we’ll show you how to install an electric bathroom heater – from gathering the right tools and materials needed for installation all the way through testing and safety checks. So grab your screwdriver, and let’s get started on installing that new heated friend of yours!
Table of Contents:
- Tools and Materials Needed
- Preparing the Wall
- Installing the Heater
- Testing and Safety Checks
- Troubleshooting Tips
- Conclusion
Tools and Materials Needed

Screwdriver: A screwdriver is essential when wall-mounting an electric bathroom heater. You will need a flathead or Phillips head screwdriver to secure the screws that attach the heater to the wall.
Drill: If you are mounting your electric bathroom heater on a wall, you will need a drill with appropriate bits to make holes and attach it securely. Make sure you use proper safety precautions when using power tools like drills.
Screws: The type of screws used depends on what kind of material your walls are made from; if they’re plasterboard, then self-tapping drywall screws should do the job just fine. For other materials, such as brick or concrete, you may need longer masonry screws instead.
Wall Anchors: Wall anchors can help provide extra support and stability when mounting heavier items, such as electric heaters, onto walls made from softer materials like plasterboard or wood panelling. They come in various sizes, so make sure you choose one that fits into your pre-drilled hole before inserting it into place and securing it with a screw.
Wire Strippers/Crimpers: Depending on how far away from your electrical outlet your new electric bathroom heater is located, you may need wire strippers/crimpers to cut and connect wires together safely and correctly according to local building codes and regulations – always consult an experienced professional if unsure about this step!
Electrical tape (or heat shrink tubing) must be applied carefully but firmly around each connection point before connecting them together securely with crimp connectors or solder joints where necessary. This helps protect exposed wiring connections against moisture damage while also providing insulation against accidental contact with live wires.
Gather all the necessary tools and materials before beginning the installation process to ensure a successful outcome. Next, prepare the wall for mounting your electric bathroom heater.
Preparing the Wall
Before you can install a wall heater, there are a few steps that need to be taken in order to prepare the wall.
Marking Out: The first step is to mark out where you will place the heater on the wall. This should be done with a pencil or marker so that it’s easy to see and ensure its level.
Measuring Space: Measure the space around your markings carefully – making sure there is enough room for your new electric bathroom heater without compromising any other fixtures or fittings in the area, such as light switches or power sockets.
Cleaning Wall Surface: Clean off any dust or dirt from the wall surface using warm water and soap. This will help ensure that no debris gets trapped behind your new electric bathroom heater when it’s being fitted into place later on down the line.
Check all wiring: If necessary, consult an expert who can advise on how to safely fit the appliance onto existing electrical systems within your home.
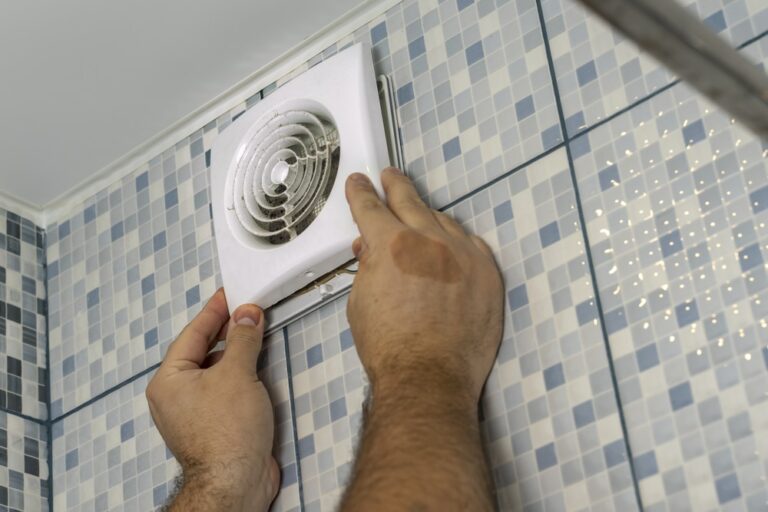
Installing the Heater
You’ll need a drill, screwdriver, screws, wall plugs or anchors (depending on what type of wall you are working with), a spirit level to ensure that your heater is installed correctly and safely, an electrical tester to check for any live wires in the area where you will be mounting it.
Once the wall has been prepared correctly, attach your electric bathroom heater securely using appropriate length screws into pre-drilled holes in accordance with manufacturer instructions provided by them when purchasing it. Ensure that all connections between wiring points are secured before connecting up to the power supply – this should only be done by a qualified electrician who can also provide certification upon completion of work carried out if required by local building regulations.
After installation is complete, carry out safety checks. Test insulation resistance values at each connection point against manufacturers’ recommended figures and check voltage readings between phases against those stated on the product label. Again, these should only be done by a qualified professional due to potential risks involved in dealing with electricity supplies.
Testing and Safety Checks

Testing and safety checks are an important part of installing any electrical appliance, especially in the bathroom. Before using wall heaters for the first time, it’s essential to make sure that they are working correctly and safely.
To test your electric bathroom heater, plug it into a power outlet and turn on the switch or button. You should hear a clicking sound as the heating element starts up. If you don’t hear this sound or if there is no heat coming from the unit after several minutes, then you may need to contact a qualified electrician for further assistance.
Once you have confirmed that your electric bathroom heater is functioning properly, it’s also important to take safety precautions when using it to avoid potential hazards such as fire or electrocution. Make sure that all wiring is secure and not exposed before turning on the unit. Also, check that there are no flammable materials near the unit, such as towels or rugs, which could catch fire if they come too close to the hot surface area while in use. Additionally, be mindful of small children who might accidentally touch hot surfaces when playing nearby – always keep them at least three feet away from any heated appliances!
Finally, remember to always turn off the switch before leaving home or going out of sight for any length of time when using an electric bathroom heater.
Now, let’s look at some troubleshooting tips for any issues you may encounter.
Troubleshooting Tips
No Power
If you’ve just installed your electric bathroom heater, but it doesn’t seem to be turning on, the first thing to check is that there is power running through it. Make sure the switch has been turned on and that all wiring connections are secure. If everything appears to be in order, try resetting the circuit breaker or replacing any blown fuses.
Overheating
If your electric bathroom heater starts to overheat, turn off the power immediately and unplug it from its outlet. Inspect for any signs of damage, such as broken wires or exposed insulation, before continuing use. If necessary, replace parts with new ones that meet safety standards and consult a qualified professional if needed.
Short-Circuiting
Short-circuiting can occur when two wires come into contact with each other due to improper installation or faulty wiring connections within the unit itself. To prevent this from happening, make sure all electrical components are securely connected and insulated properly before powering up your electric bathroom heater again. Also, inspect for any frayed or damaged wires, which could lead to short-circuiting down the line if not addressed promptly.
Power Surges
It is important to take precautions when using an electric bathroom heater near water sources like showers or baths where moisture may be present in large amounts. Surge protectors should be installed between outlets and devices whenever possible to protect against potential damage. This will help absorb excess voltage spikes, which could otherwise fry electronics inside of appliances, including heaters themselves.
Conclusion
Installing an electric bathroom heater is a great way to keep your bathroom warm and cosy. With the right tools, materials and guidance, you can have it up and running in no time! Hopefully, this guide has given you all the information needed to install an electric bathroom heater safely and successfully. If any problems arise during installation, refer back to our troubleshooting tips for help.
Are you looking for a comprehensive guide on how to install an electric bathroom heater? Look no further than Homes Whiz! Our blog provides detailed reviews and step-by-step instructions on home and garden products so that you can find the perfect solution for your needs. Whether it’s choosing the right type of heater or figuring out how to get started with installation, our experts have got you covered!